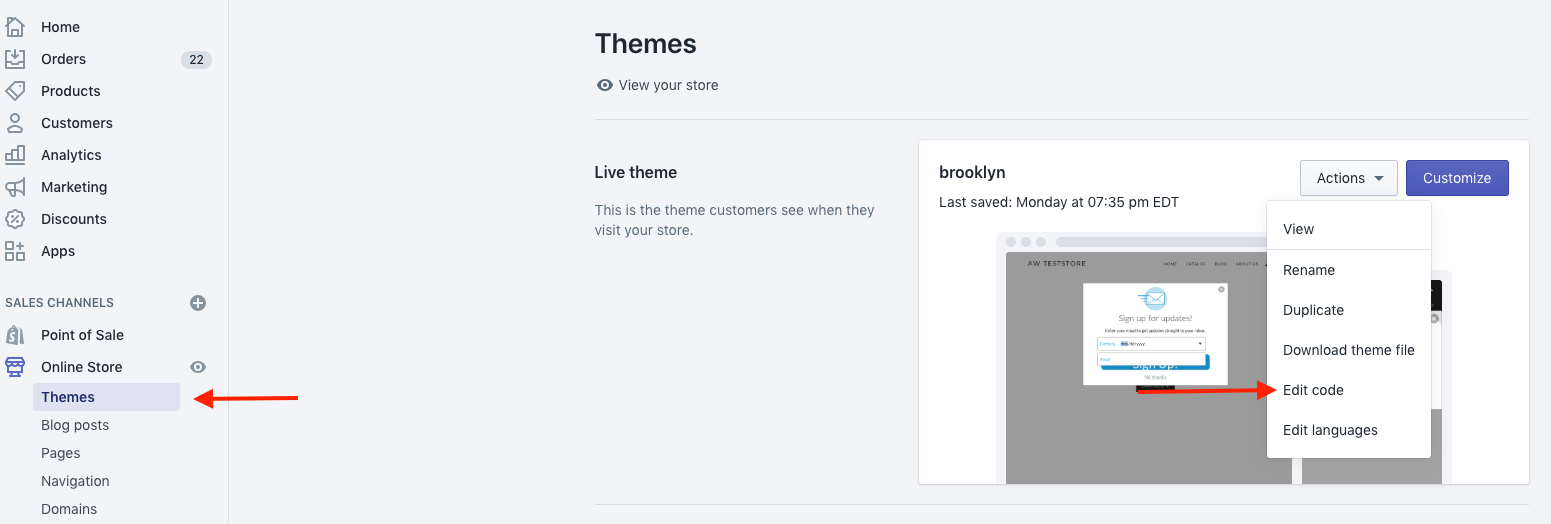
Setting up user behavior tracking on Shopify is simple with Retention Science. Real-time event tracking is implemented by inserting our JavaScript snippets into your Shopify theme. This guide shows you how to update our JavaScript code into Liquid, Shopify’s templating language.
- Navigate to Shopify Sales Channel Themes > Click action > Edit code.

- In the file tree, under the Snippets folder, click resci-main.v1.liquid. The snippet already contains the tracking code for the following events:
- Regular Page View JavaScript Event
- Item Page View JavaScript Event
- Shopping Cart View JavaScript Event
- Search Javascript Event
- Implement support for the 'Email Capture Event.' Be sure to update the code highlighted in red:
- Paste the 'md5.js' tracking script tag after <!-- ReSci start ... -->.
<!-- ReSci start (Inserted on: 2020-10-19 17:04:25 UTC -->
<script src="https://cdnjs.cloudflare.com/ajax/libs/blueimp-md5/2.10.0/js/md5.js"></script>
<script type="text/javascript"> - Paste your updated 'Email Capture' code just before the /*** ReSci Script ***/ comment. The code should be updated to match your site and specific element names.
<!-- ReSci start (Inserted on: 2020-10-19 17:04:25 UTC -->
<script src="https://cdnjs.cloudflare.com/ajax/libs/blueimp-md5/2.10.0/js/md5.js"></script>
<script type="text/javascript">
  window._rsq = window._rsq || [];
  window._rsq.push(['_setSiteId', '123']); // Your unique ReSci ID
  window._rsq.push(['_enableOnsite']);

{% if customer %}
  window._rsq.push(['_setUserId', '{{ customer.id }}']);
  window._rsq.push(['_setUserEmail', '{{ customer.email }}']);
{% endif %}

/*** Item View Event ***/
{% if template.name == 'product' and product %}
  {% if product.first_available_variant.id %}
    window._rsq.push(['_addItem', {'id': '{{product.first_available_variant.id}}'}]);
  {% endif %}

  {% if product.first_available_variant.id == '' %}
   window._rsq.push(['_addItem', {'id': '{{product.id}}'}]);
  {% endif %}
{% endif %}

/*** Cart View Event ***/
{% if template.name == 'cart' %}
  {% for item in cart.items %}
   window._rsq.push(['_addItem', { 'id':'{{ item.id }}', 'name':"{{ item.title }}", 'price':'{{ item.price | money_without_currency }}' }]);
  {% endfor %}
  window._rsq.push(['_setAction', 'shopping_cart']);
{% endif %}

/*** Search View Event ***/
{% if template.name == 'search' and search.performed %}  window._rsq.push(['_setAction', 'search']) ;
 window._rsq.push(['_setParams', { 'term': '{{ search.terms }}'}]);
{% endif %}

window._rsq.push(['_track']);

/*** Email Capture Event ***/
window.addEventListener('DOMContentLoaded', function(_rsq){
    document.getElementById("email_signup").addEventListener("submit", function(){
        // update the param within getELementById to the ID name of the email capture form
        var uEmail = document.getElementById('k_id_email').value;
        // update the param getELementById to the ID name of the email input
        window._rsq.push(['_setUserEmail', uEmail]);
        window._rsq.push(['_setUserProperties', { 'record_id': md5(uEmail.toLowerCase()),'email':uEmail, 'registration_source':'footer'}]); // (Optional) You can pass any ReSci standard user data point
        window._rsq.push(['_setAction', 'email_entered']);
        window._rsq.push(['_track']);
    });
});

/*** ReSci Script ***/
(function() {
  var rScix = document.createElement('script');
    rScix.type = 'text/javascript';
    rScix.async = true;
   rScix.src = ('https:' == document.location.protocol ? 'https://' : 'http://') + 'd1stxfv94hrhia.cloudfront.net/waves/v3/w.js';
   (document.getElementsByTagName('head')[0] || document.getElementsByTagName('body')[0]).appendChild(rScix);
  })();
</script>
<!-- ReSci end -->
| Double-check your website and form behavior: The email_entered action creates a user who is opted-in to email, after which the user can only be unsubscribed. Make sure that the user has a chance to explicitly opt-in before your forms trigger this action. |
Please proceed to add the checkout success event by clicking the link below:
- Instructions to implement Checkout Success Javascript
Comments
0 comments
Please sign in to leave a comment.