Prerequisites:
- Please ensure that you've integrated with the Retention Science Data API as described here.
- Please reach out to your Client Success Manager or help@retentionscience.com to request the creation of a new custom user attribute (E.g. lead_capture_coupon). This custom attribute will be populated with the coupon code passed to Retention Science when the form is submitted.
Creating a coupon group
- Log into ReSci Lead Capture and click on the "Additional Settings" arrow in the upper right-hand corner and click Coupon from the drop-down menu. If your coupon codes have already been uploaded to the Lead Capture tool, identify the coupon ID you would like to use and proceed to the next section.

- Click + New Coupon Group and enter a Group Name, an Offer Description, select Box Submit from the drop-down, and click Create Coupon Group.

- Upload a list of coupons and click Submit. Note the ID of the Coupon Group you intend to use. If the ID is 132, your coupon merge tag will be [COUPON_132].


Setting up your Lightbox for the coupons
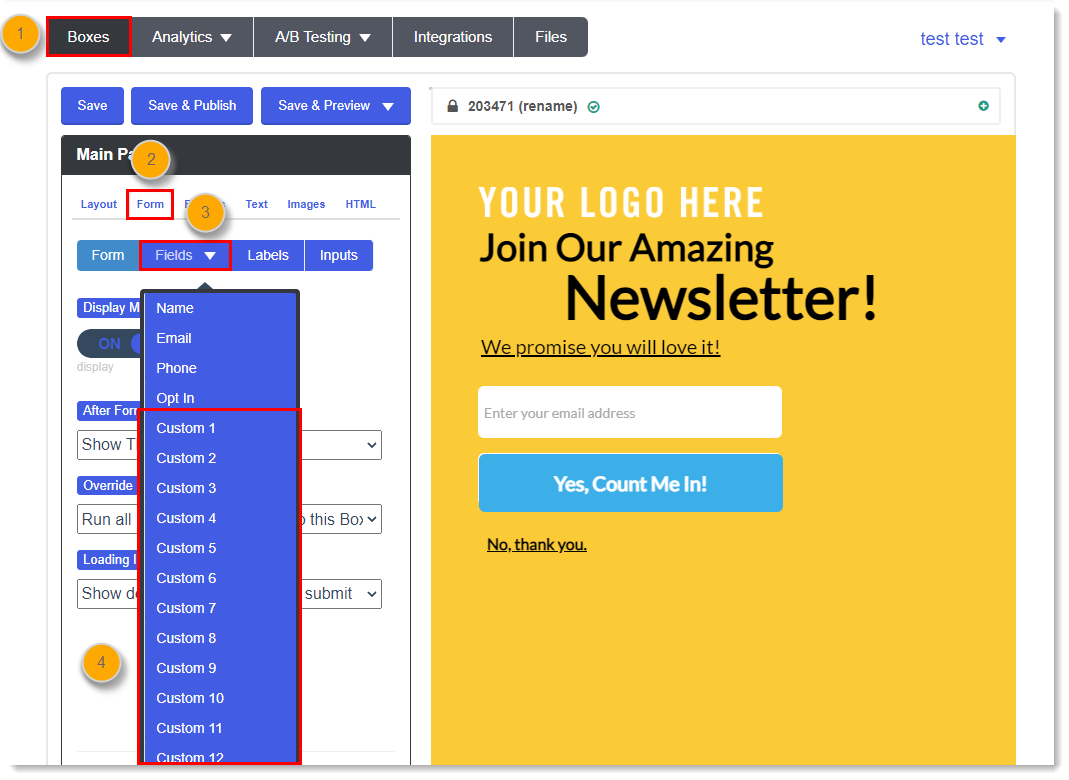
- Open a new Lightbox.
- Click Form.
- Choose Fields to open a drop down.
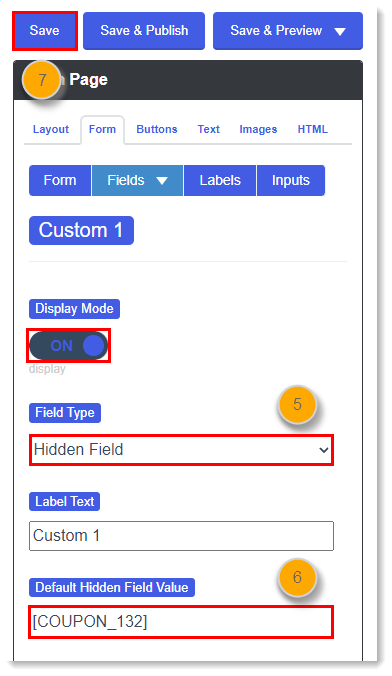
- Select a Custom field that is not currently in use and change the field type to Hidden. In this example we will use Custom_1, but any Custom field value can be used except for Custom_20.

- Toggle the "Display Mode" to ON and set the "Field Type" to Hidden Field.
- Under “Default Hidden Field Value” enter your Coupon Merge Tag. IE [COUPON_132]
- When complete, Save your box.

Creating a Lighbox integration to pass the coupon codes
- Click Integrations from the top of the page.
- Click the New Integration button.

- Type in your desired Integration title for Friendly Name.
- Choose the Retention Science (Advanced) for the Integration type.
- Click Create Integration.

- On the new page enter your API token and click Save.

- Click Fields next to the Integration you have just created.

- Paste in the following code:
{
"id": "[ID]",
"email": "[EMAIL]",
"registration_source": "Lead Capture",
"custom_attributes": {
  "lead_capture": {
     "custom_1": "[CUSTOM_1]"
  }
 },
}
Note: The payload should mirror the data being captured in the popup form. The example payload below is for a Lead Capture box that is only capturing user emails. If your Lead Capture form is capturing additional data, be sure to incorporate that into the payload. Any attributes missing from the payload will not be synced with Cortex.
- Determine which ReSci custom user attribute will store the coupon codes being sent to Cortex via API. If you'd like to see a list of available Lead Capture custom user attributes, ReSci's tech support team can help retrieve that information for you. For this example we will be using: Lead_capture$capture1. Replace lead_capture with the first part of your custom attribute up to the $. Then, replace custom_1 with the second part of your custom attribute after the $. Optional: If in previous steps you had selected a Custom field other than CUSTOM_1, change the number to reflect your selected option.
- Click the Save button.

- Click Boxes from the top navigation bar.
- Find the Lightbox that you newly created and click Add to the right of the name.

- Click the drop down and select the Integration you newly created.
- Click Save Integration.

Comments
0 comments
Please sign in to leave a comment.