Welcome to ReSci!
When you're getting started, it's important to make sure that your users' data is imported correctly from the Mailchimp platform into Cortex. This article shows how to amend the standard subscribed users file from Mailchimp and upload into Cortex.
Amend your file
Below is an example of the data that is included in a Mailchimp subscribed users list:

First, delete the columns with the data we don't need:

Next, rename the column headers with the supported names.
Incorrect headers:

Correct headers:

Use the formula =CONCATENATE(col1," ",col2) to combine your first and last name columns with a space between them or view: How to merge First Name and Last Name to full_name.
Make sure to format date to yyyy-mm-dd:

See: How to format dates in Excel
Finally, save as a "Comma Separated Values (.csv)" file:

Upload your file
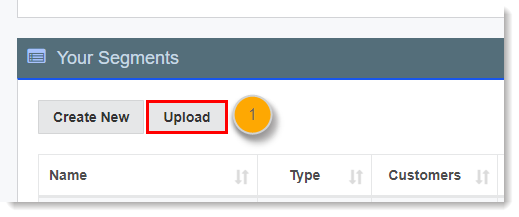
Now that the spreadsheet is ready, log into Cortex to upload the list, and access your Segments page, found within the Audience menu.
- Click Upload in the "Your Segments" section.

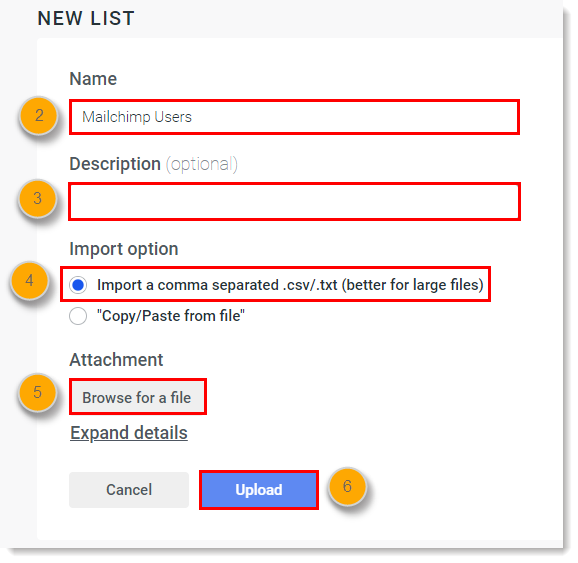
- Name your list upload.
- (Optional) Enter a description for your upload.
- Select the import option "Import a comma-separated .csv/.txt file"
- Click Browse for a file to attach your file to the upload.
- Click Upload.

What about my other files?
- Unsubscribed: This list should be uploaded with the UNSUB_TIME column header changed to "date_unsubscribed".
- Cleaned: This list can be ignored or uploaded with the CLEAN_TIME column header changed to "date_unsubscribed".
- Non-subscribed: The users in this list may not be aware their email address is in your mailing list. If you want to include these users as subscribers, you may want to consider reaching out to them with special targeted campaigns to reintroduce your brand.
Other Resources:
Comments
0 comments
Please sign in to leave a comment.